Stap 10: Nemen LED Strips
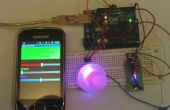
Nu dat u op het Seeed Bluetooth-schild op de Arduino aansluit en verzenden van tekens, is het tijd om te beginnen met het beheersen van de LED strips.Voert u de volgende schets van de Arduino:
/* Phone Controlled Mood Lighting - Arduino Code by Nicole Grimwood Based upon: Seeed Wiki Bluetooth slave code http://www.seeedstudio.com/wiki/index.php?title=Bluetooth_Shield Pololu LED Strip Example Code https://github.com/pololu/pololu-led-strip-arduino This code is in the public domain. */ #include <avr/pgmspace.h> #include <SoftwareSerial.h> // Software Serial Port #include <PololuLedStrip.h> #define RxD 6 // This is the pin that the Bluetooth (BT_TX) will transmit to the Arduino (RxD) #define TxD 7 // This is the pin that the Bluetooth (BT_RX) will receive from the Arduino (TxD) #define DEBUG_ENABLED 1 // Create an ledStrip object on pin 12. PololuLedStrip<12> ledStrip; // Create a buffer for holding 3 colors. Takes 180 bytes. #define LED_COUNT 3 rgb_color colors[LED_COUNT]; SoftwareSerial blueToothSerial(RxD,TxD); #define DATA_1 (PORTC |= 0X01) // DATA 1 #define DATA_0 (PORTC &= 0XFE) // DATA 0 #define STRIP_PINOUT (DDRC=0xFF) void setup() { // Set interrupt friendly to true so that the LED // strips work with the bluetooth shield PololuLedStripBase::interruptFriendly=true; pinMode(RxD, INPUT); // Setup the Arduino to receive INPUT from the bluetooth shield on Digital Pin 6 pinMode(TxD, OUTPUT); // Setup the Arduino to send data (OUTPUT) to the bluetooth shield on Digital Pin 7 setupBlueToothConnection(); // Used to initialize the Bluetooth shield } void loop() { char recvChar; while(1){ if(blueToothSerial.available()){ // check if there's any data sent from the remote bluetooth shield recvChar = blueToothSerial.read(); Serial.print(recvChar); // Print the character received to the Serial Monitor (if required) // if the character received is a, use the white pattern if(recvChar=='a'){ delay(500); // necessary for LED strips to work with bluetooth shield //used to assign colors to each of the 3 sections of the LED strips colors[0]=(rgb_color){250,250,250}; colors[1]=(rgb_color){250,250,250}; colors[2]=(rgb_color){250,250,250}; ledStrip.write(colors, LED_COUNT); } // if character received is b, use the pink pattern if(recvChar=='b'){ delay(500); colors[0]=(rgb_color){250,220,0}; colors[1]=(rgb_color){250,220,0}; colors[2]=(rgb_color){250,220,0}; ledStrip.write(colors, LED_COUNT); } // if character received is c, use the red and orange pattern if(recvChar=='c'){ delay(500); colors[0]=(rgb_color){250,0,0}; colors[1]=(rgb_color){250,0,230}; colors[2]=(rgb_color){250,0,0}; ledStrip.write(colors, LED_COUNT); } // if character received is d, use the blue and purple pattern if(recvChar=='d'){ delay(500); colors[0]=(rgb_color){0,220,0}; colors[1]=(rgb_color){50,220,0}; colors[2]=(rgb_color){0,220,0}; ledStrip.write(colors, LED_COUNT); } } } } // The following code is necessary to setup the bluetooth shield void setupBlueToothConnection(){ blueToothSerial.begin(38400); //Set BluetoothBee BaudRate to default baud rate 38400 blueToothSerial.print("\r\n+STWMOD=0\r\n"); //set the bluetooth work in slave mode blueToothSerial.print("\r\n+STNA=SeeedBTSlave\r\n"); //set the bluetooth name as "SeeedBTSlave" blueToothSerial.print("\r\n+STOAUT=1\r\n"); // Permit Paired device to connect me blueToothSerial.print("\r\n+STAUTO=0\r\n"); // Auto-connection should be forbidden here delay(2000); // This delay is required. blueToothSerial.print("\r\n+INQ=1\r\n"); //make the slave bluetooth inquirable Serial.println("The slave bluetooth is inquirable!"); delay(2000); // This delay is required. blueToothSerial.flush(); } Het volgende schema draaien op het Android apparaat:
/* Phone Controlled Mood Lighting - Android Sketch by Nicole Grimwood Based upon: BluetoothApp1 created on March 25, 2013 by ScottC */ import android.content.BroadcastReceiver; import android.content.Context; import android.content.Intent; import android.content.IntentFilter; import android.widget.Toast; import android.view.Gravity; import android.bluetooth.BluetoothAdapter; import android.bluetooth.BluetoothDevice; import java.util.UUID; import java.io.IOException; import java.io.InputStream; import java.io.OutputStream; import android.os.Handler; import android.os.Message; import android.util.Log; import android.bluetooth.BluetoothServerSocket; import android.bluetooth.BluetoothSocket; import apwidgets.*; public BluetoothSocket scSocket; //Used for the GUI************************************** APWidgetContainer widgetContainer; APButton whiteButton, pinkButton, redOrangeButton, blueButton; String buttonText=""; int buttonWidth=0; int buttonHeight=0; int n=5; //number of buttons int gap=10; //gap between buttons boolean foundDevice=false; //When true, the screen turns green. boolean BTisConnected=false; //When true, the screen turns purple. // Message types used by the Handler public static final int MESSAGE_WRITE = 1; public static final int MESSAGE_READ = 2; String readMessage=""; //Used to send bytes to the Arduino SendReceiveBytes sendReceiveBT=null; //Get the default Bluetooth adapter BluetoothAdapter bluetooth = BluetoothAdapter.getDefaultAdapter(); /*The startActivityForResult() within setup() launches an Activity which is used to request the user to turn Bluetooth on. The following onActivityResult() method is called when this Activity exits. */ protected void onActivityResult(int requestCode, int resultCode, Intent data) { if (requestCode==0) { if (resultCode == RESULT_OK) { ToastMaster("Bluetooth has been switched ON"); } else { ToastMaster("You need to turn Bluetooth ON !!!"); } } } /* Create a BroadcastReceiver that will later be used to receive the names of Bluetooth devices in range. */ BroadcastReceiver myDiscoverer = new myOwnBroadcastReceiver(); /* Create a BroadcastReceiver that will later be used to identify if the Bluetooth device is connected */ BroadcastReceiver checkIsConnected = new myOwnBroadcastReceiver(); // The Handler that gets information back from the Socket private final Handler mHandler = new Handler() { public void handleMessage(Message msg) { switch (msg.what) { case MESSAGE_WRITE: //Do something when writing break; case MESSAGE_READ: //Get the bytes from the msg.obj byte[] readBuf = (byte[]) msg.obj; // construct a string from the valid bytes in the buffer readMessage = new String(readBuf, 0, msg.arg1); break; } } }; void setup() { orientation(LANDSCAPE); //Setup GUI******************************** buttonWidth=((width/n)-(n*gap)); buttonHeight=(height/2); widgetContainer = new APWidgetContainer(this); //create new container for widgets whiteButton =new APButton((buttonWidth*(n-5)+(gap*1)), gap, buttonWidth, buttonHeight, "White"); //Create a color fade button pinkButton = new APButton((buttonWidth*(n-4)+(gap*2)), gap, buttonWidth, buttonHeight, "Pink"); //Create a pattern button redOrangeButton = new APButton((buttonWidth*(n-3)+(gap*3)), gap, buttonWidth, buttonHeight, "Red Orange"); //Create a red orange button blueButton = new APButton((buttonWidth*(n-2)+(gap*4)), gap, buttonWidth, buttonHeight, "Blue"); //Create a blue button widgetContainer.addWidget(whiteButton); //place color fade button in container widgetContainer.addWidget(pinkButton); //place pattern fade button in container widgetContainer.addWidget(redOrangeButton);//place red orange button in container widgetContainer.addWidget(blueButton);//place blue button in container background(0); //Start with a black background /*IF Bluetooth is NOT enabled, then ask user permission to enable it */ if (!bluetooth.isEnabled()) { Intent requestBluetooth = new Intent(BluetoothAdapter.ACTION_REQUEST_ENABLE); startActivityForResult(requestBluetooth, 0); } /*If Bluetooth is now enabled, then register a broadcastReceiver to report any discovered Bluetooth devices, and then start discovering */ if (bluetooth.isEnabled()) { registerReceiver(myDiscoverer, new IntentFilter(BluetoothDevice.ACTION_FOUND)); registerReceiver(checkIsConnected, new IntentFilter(BluetoothDevice.ACTION_ACL_CONNECTED)); //Start bluetooth discovery if it is not doing so already if (!bluetooth.isDiscovering()) { bluetooth.startDiscovery(); } } } void draw() { //Display a green screen if a device has been found, //Display a purple screen when a connection is made to the device if (foundDevice) { if (BTisConnected) { background(200, 70, 255); // purple screen } else { background(0, 200, 50); // green screen } } //Change the text based on the button being pressed. text(buttonText, 20, buttonHeight+(buttonHeight/2)); } /* This BroadcastReceiver will display discovered Bluetooth devices */ public class myOwnBroadcastReceiver extends BroadcastReceiver { ConnectToBluetooth connectBT; public void onReceive(Context context, Intent intent) { String action=intent.getAction(); ToastMaster("ACTION:" + action); //Notification that BluetoothDevice is FOUND if (BluetoothDevice.ACTION_FOUND.equals(action)) { //Display the name of the discovered device String discoveredDeviceName = intent.getStringExtra(BluetoothDevice.EXTRA_NAME); ToastMaster("Discovered: " + discoveredDeviceName); // Display more information about the discovered device BluetoothDevice discoveredDevice = intent.getParcelableExtra(BluetoothDevice.EXTRA_DEVICE); //Change foundDevice to true which will make the screen turn green foundDevice=true; //Connect to the discovered bluetooth device (SeeedBTSlave) if (discoveredDeviceName.equals("SeeedBTSlave")) { ToastMaster("Connecting you Now !!"); unregisterReceiver(myDiscoverer); connectBT = new ConnectToBluetooth(discoveredDevice); //Connect to the the device in a new thread new Thread(connectBT).start(); } } //Notification if bluetooth device is connected if (BluetoothDevice.ACTION_ACL_CONNECTED.equals(action)) { ToastMaster("CONNECTED _ YAY"); int counter=0; while (scSocket==null) { //do nothing } ToastMaster("scSocket" + scSocket); BTisConnected=true; //turn screen purple if (scSocket!=null) { sendReceiveBT = new SendReceiveBytes(scSocket); new Thread(sendReceiveBT).start(); String begin = "a"; byte[] myByte = stringToBytesUTFCustom(begin); sendReceiveBT.write(myByte); } } } } public static byte[] stringToBytesUTFCustom(String str) { char[] buffer = str.toCharArray(); byte[] b = new byte[buffer.length << 1]; for (int i = 0; i < buffer.length; i++) { int bpos = i << 1; b[bpos] = (byte) ((buffer[i]&0xFF00)>>8); b[bpos + 1] = (byte) (buffer[i]&0x00FF); } return b; } public class ConnectToBluetooth implements Runnable { private BluetoothDevice btShield; private BluetoothSocket mySocket = null; private UUID uuid = UUID.fromString("00001101-0000-1000-8000-00805F9B34FB"); public ConnectToBluetooth(BluetoothDevice bluetoothShield) { btShield = bluetoothShield; try { mySocket = btShield.createRfcommSocketToServiceRecord(uuid); } catch(IOException createSocketException) { //Problem with creating a socket Log.e("ConnectToBluetooth", "Error with Socket"); } } public void run() { /* Cancel discovery on Bluetooth Adapter to prevent slow connection */ bluetooth.cancelDiscovery(); try { /*Connect to the bluetoothShield through the Socket. This will block until it succeeds or throws an IOException */ mySocket.connect(); scSocket=mySocket; } catch (IOException connectException) { Log.e("ConnectToBluetooth", "Error with Socket Connection"); try { mySocket.close(); //try to close the socket } catch(IOException closeException) { } return; } } // Will allow you to get the socket from this class public BluetoothSocket getSocket() { return mySocket; } /* Will cancel an in-progress connection, and close the socket */ public void cancel() { try { mySocket.close(); } catch (IOException e) { } } } private class SendReceiveBytes implements Runnable { private BluetoothSocket btSocket; private InputStream btInputStream = null; ; private OutputStream btOutputStream = null; String TAG = "SendReceiveBytes"; public SendReceiveBytes(BluetoothSocket socket) { btSocket = socket; try { btInputStream = btSocket.getInputStream(); btOutputStream = btSocket.getOutputStream(); } catch (IOException streamError) { Log.e(TAG, "Error when getting input or output Stream"); } } public void run() { byte[] buffer = new byte[1024]; // buffer store for the stream int bytes; // bytes returned from read() // Keep listening to the InputStream until an exception occurs while (true) { try { // Read from the InputStream bytes = btInputStream.read(buffer); // Send the obtained bytes to the UI activity mHandler.obtainMessage(MESSAGE_READ, bytes, -1, buffer) .sendToTarget(); } catch (IOException e) { Log.e(TAG, "Error reading from btInputStream"); break; } } } /* Call this from the main activity to send data to the remote device */ public void write(byte[] bytes) { try { btOutputStream.write(bytes); } catch (IOException e) { Log.e(TAG, "Error when writing to btOutputStream"); } } /* Call this from the main activity to shutdown the connection */ public void cancel() { try { btSocket.close(); } catch (IOException e) { Log.e(TAG, "Error when closing the btSocket"); } } } /* My ToastMaster function to display a messageBox on the screen */ void ToastMaster(String textToDisplay) { Toast myMessage = Toast.makeText(getApplicationContext(), textToDisplay, Toast.LENGTH_SHORT); myMessage.setGravity(Gravity.CENTER, 0, 0); myMessage.show(); } //onClickWidget is called when a widget is clicked/touched void onClickWidget(APWidget widget) { String sendLetter = ""; //Disable the previous Background colour changers foundDevice=false; BTisConnected=false; if (widget == whiteButton) { //if the red button was clicked buttonText="white"; background(0, 255, 100); sendLetter = "a"; } else if(widget == pinkButton){ buttonText = "Pink"; background(0, 200,200); sendLetter = "b"; } else if (widget == redOrangeButton) { //if the blue button was clicked buttonText="Red Orange"; background(255, 90, 0); sendLetter = "c"; } else if (widget == blueButton) { //if the off button was clicked buttonText="Blue"; background(50,100,155); sendLetter = "d"; } byte[] myByte = stringToBytesUTFCustom(sendLetter); sendReceiveBT.write(myByte); } Zodra u al deze code die wordt uitgevoerd, moet u zitten kundig voor druk op de knoppen op de app om de kleur van de LED strips. Opmerking: Als de telefoon inactief te lang is, verliest u bluetooth-verbinding en je moet sluiten van de app op uw telefoon en haal het licht bord. U kunt dan stekker in de Raad van bestuur opnieuw en opnieuw de app en op opnieuw moet verbinden.

